Problem: How to automate regression on UI screens?
Solution: Snapshot Tests !
SwiftUI and the Live Preview are a good match
Thanks to them I was able to quickly build this view:

The Live Preview is effective for creating views
But does not warn in case of regressions
So you have to write automated tests
Tests will be done on the smallest iOS 13 compatible iPhone
An iPhone SE
Import of the SnapshotTest library via SPM
github.com/pointfreeco/swift-snapshot-testing
Import the library into the test target
Not the app target
Import SnapshotTest library into test file
And create the first snapshot
import XCTest
@testable import SnapshotTest
import SnapshotTesting
import SwiftUI

class StatisticsViewSnapshotTests: XCTestCase {

  func test_lightMode() {
    let viewModel = StatisticsViewModel()
    let statisticsView = StatisticsView(viewModel: viewModel)
    let sut = UIHostingController(rootView: statisticsView)

    assertSnapshot(matching: sut.rootView,
                   as: .image(drawHierarchyInKeyWindow: true, // 1
                              layout: .device(config: .iPhoneSe),
                              traits: .init(userInterfaceStyle: .light)))
  }
}
drawHierarchyInKeyWindowallows to render the view on top of the SwiftUI view
This is required or the visual blur effect of the tab bar will not be visible
Because this effect is on top at the window level
Run the first test
It fails:
failed - No reference was found on disk. Automatically recorded snapshot: …
The first time the test is run
The snapshot created cannot be compared with a previous one
So he failed
But this snapshot has been saved for future comparisons
open "/Users/alexandre/Documents/SnapshotTest/SnapshotTestTests/Snapshots/StatisticsViewSnapshotTests/test_lightMode.1.png"
Path of the saved snapshot
Enter this command in Terminal
Allows access to the location of the snapshot
Re-run "test" to test against the newly-recorded snapshot.
Must run this test again
To create a new snapshot
And compare it to the previous one
Here is the saved snapshot:

Creation of an helper function makeSUT()
That will facilitate test setup
And also prevent any breaking changes:
private func makeSUT() -> (sut: UIHostingController<StatisticsView>, viewModel: StatisticsViewModel) {
    let viewModel = StatisticsViewModel()
    let statisticsView = StatisticsView(viewModel: viewModel)
    let sut = UIHostingController(rootView: statisticsView)
    return (sut, viewModel)
  }
Creation of an assertSnapshot() function helper
Easy test setup
Improve test readability
Avoid repetitions
private func assertSnapshot(matching controller: UIHostingController<StatisticsView>, traits: UITraitCollection = .init(userInterfaceStyle: .light), testName: String, file: StaticString = #filePath, line: UInt = #line) {
    SnapshotTesting.assertSnapshot(matching: controller.rootView,
                                   as: .image(drawHierarchyInKeyWindow: true,
                                              layout: .device(config: .iPhoneSe),
                                              traits: traits),
                                   named: "StatisticsView",
                                   file: file,
                                   testName: testName,
                                   line: line)
  }
Refactor the test like this:
  func test_lightMode() {
    let (sut, _) = makeSUT()

    assertSnapshot(matching: sut, testName: "LIGHT_MODE")
  }
Creation of test for Dark mode
  func test_darkMode() {
    let (sut, _) = makeSUT()

    assertSnapshot(matching: sut,
                   traits: .init(userInterfaceStyle: .dark),
                   testName: "DARK_MODE")
  }
Here is the saved snapshot:

Creation of test for dymamic type
  func test_dynamicType() {
    let (sut, _) = makeSUT()

    assertSnapshot(matching: sut,
                   traits: .init(preferredContentSizeCategory: .extraExtraExtraLarge),
                   testName: "EXTRA_EXTRA_EXTRA_LARGE")
  }
Here is the new snapshot:

Now test the UI according to the user input
You cannot directly test a swiftUI view
But can change the view state via the view model
To verify that UI behaves correctly
  func test_ascendingOrder() {
    let (sut, viewModel) = makeSUT()

    viewModel.toggleDescending()

    assertSnapshot(matching: sut,
                   testName: "ASCENDING_ORDER")
  }
Here is the new snapshot:
 The arrow of the image is inverted
Transactions are in ascending order
Everything is good 😎
Simulation of a regression
To see how to debug a test failure
Remove the "s" letter from the title "Statistics"
Run of all tests
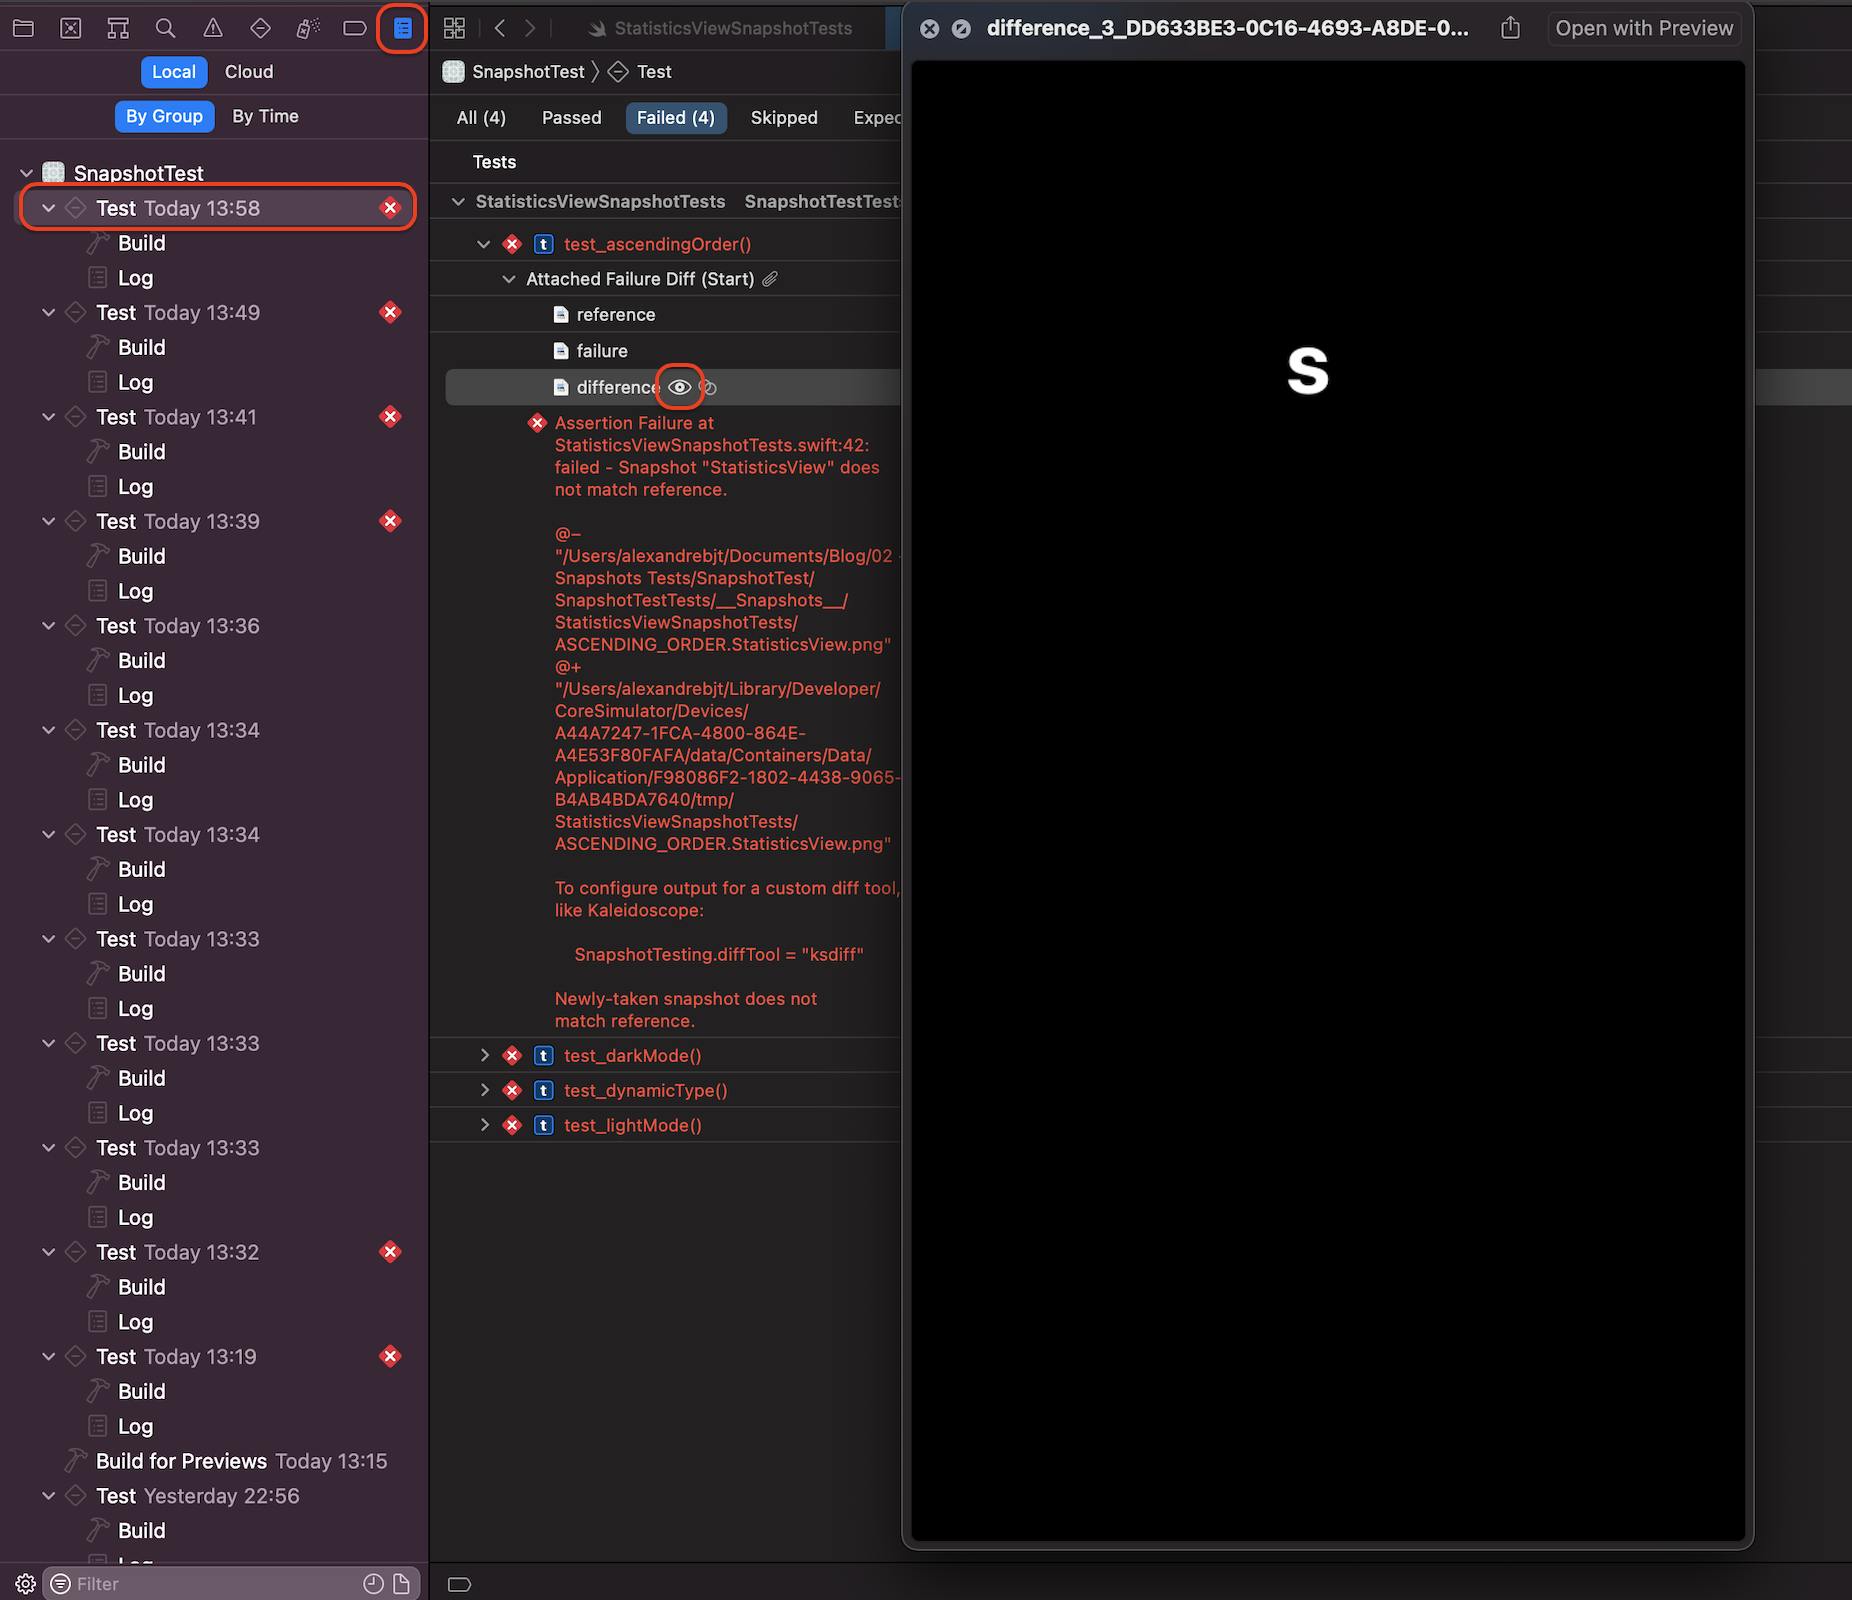
They failed:
failed - Snapshot "StatisticsView" does not match reference.
In the build section
We can see where the problem comes from
The diff snapshot clearly tells you where the problem is
Here the letter "s" which has disappeared
 This diff snapshot helps a lot
Tell you precisely where the problem is
That avoid to waste time in debug
Increasing the value of those tests
To conclude
These snapshots can be integrated into GIT
And these tests can be automated via CI/CD
I hope you enjoyed this test snapshots introduction
It is a very powerful tool
A must have it in your toolbox
That's it !!


